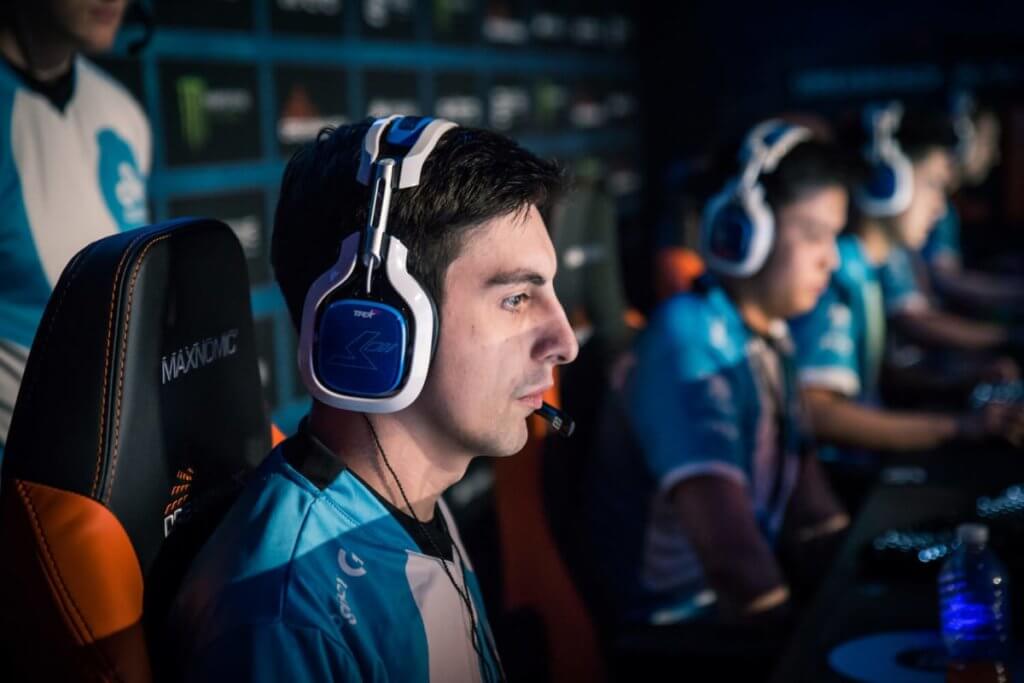
So, you’ve installed the OBS and have done a few streaming sessions, only to be ultimately disappointed in their quality. You don’t know what you have done wrong, and just by looking at different OBS settings you can feel a slight headache creeping in. I will be your guide and show you the best streaming settings that OBS has to offer. Soon, your Twitch streams will be among the best in terms of quality of production.
Fast navigation
OBS orientation course
Let’s have a quick run-through the basic parts of OBS.

The big black screen you see immediately after you enter OBS shows the preview of your stream. This is exactly what your followers will see while you are streaming on Twitch.
In the bottom left corner, there is a scenes window. You can think about scenes as sort of intermissions. You can use them to announce the beginning and end of your Twitch stream, technical difficulties, etc.
Next, we have sources. These are all the things that you want to present in your stream: webcam, game, microphone, messages from Twitch followers…
Just on the right from sources, we have a mixer. With it, you can manipulate the settings of all your audio sources to get the best sound.
After the mixer, we have a scenes transitions window, which is pretty self-explanatory.
Finally, in the bottom right corner, we have controls. This is where you will stop and start Twitch streams and tweak all your OBS settings. Your uptime is displayed on the bottom, along with frame rate and CPU usage.
As you can see, OBS has a user-friendly design that is very forgiving to beginner Twitch streamers.
Should I use a separate PC for gaming and streaming?
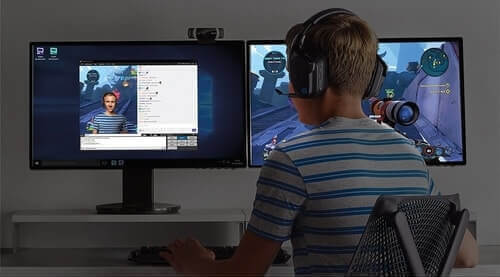
This right here is one of the most common beginner questions. I highly recommend that you use a 2 computer setup: one dedicated PC for streaming on Twitch, and other for gaming, If you can justifying the cost.
This setup is widely popular in the streaming community and almost all best gamers do this. Even if you don’t play with settings in your OBS, doing this can radically improve your streaming performance. It is best to have one that focuses exclusively on Twitch streaming.
Best OBS Settings
If you have a dedicated computer for streaming, you should be using the best settings.
- Resolution: 1080p
- Frame rate: 60 FPS
- Bitrate: 4500 to 6000 kbps
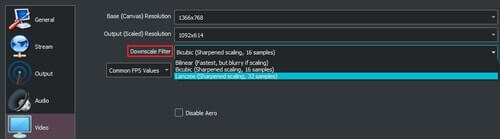
- Encoding: Lanczos (to change this go to video settings> downscale filter)
For more minor tweaks, watch this video.
If you decide to game and stream from a single PC, these settings might be the best for you.
- Resolution: 720p
- Frame rate: 30 FPS
- Bitrate: 3500 to 5000 kbps
- Encoding: Bicubic
If you have a mid-range PC, choose these settings:
- Resolution: 720p
- Frame rate: 30 FPS
- Bitrate: 2500 to 4000 kbps
- Encoding: Bilinear
What you will need to get the best OBS settings
Since there are so many things you need to take into consideration, the best OBS settings for Twitch streaming will vary from case to case. For now, I will assume that your PC is powerful enough to run OBS on highest settings. If that isn’t the case, you can proceed to the other section where we will focus on how to get the best stream quality that your PC can handle.
1. Top-of-the-line hardware
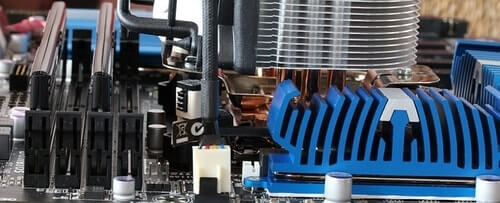
OBS settings will be most influenced by the quality of your hardware. To get the best, 1080p HD quality, stream going at 60 FPS you will need to have an i7 or i9 processor, at least 16 GB of RAM and a great graphics card. I would recommend something like Nvidia’s GTX 1060, ASUS’s RX 550 or XFX Radeon RX 580. If you want to be recording your streams, you will also need a capture card. A great microphone and solid webcam are also necessary if you want to take Twitch streaming seriously.
If you are interested in building a better streaming PC (or just want to update your gaming components), check our setup articles. We have various ones featuring some of the best popular streamers like Tfue, Shroud…
2. Fast internet speed
Streaming at best quality also requires a high bitrate. Bitrate is the amount of data your PC sends out to the Twitch server. For a stable 1080p 60 fps streaming, you will need bitrate in the range of 4500 to 6000 kbps (4.5 to 6 Mbps). Don’t know your upload speed? Best to test it here.
If your internet speed is subpar, it’s best to be streaming on lower quality and upload your recording after. Otherwise, you will experience constant lags and lowering of resolution, which will ultimately cost you your Twitch followers.
For more info on this topic, check out this guideline made by Twitch.
3. Align your game and streaming frame rates
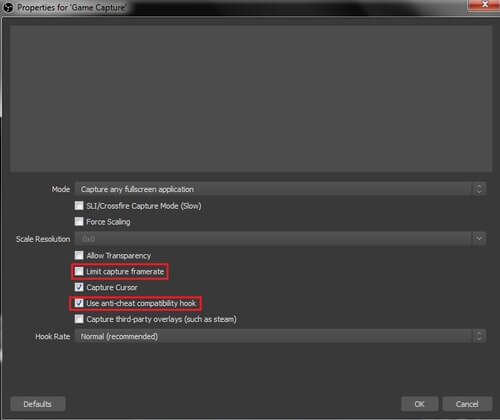
It might happen that your game runs on a higher frame rate than your OBS stream allows. If this happens, you might experience some FPS issues, like frame dropping or skipping. To circumvent this, simply check limit capture frame rate box in your game and in the OBS settings.
If you are experiencing a black screen, it may be because the game’s anti-cheat technology is interfering with OBS. Anti-cheat compatibility hook presented in settings is a good solution.
4. Fullscreen game capture
In OBS, go to your sources screen, right click and select game capture. In settings, you can select between 3 different modes: fullscreen, specific window, and foreground window. Most people prefer fullscreen, so select that for now. Window mode will serve you best if you are gaming and streaming from a single PC. It makes it much easier to switch between programs and communicate with your Twitch followers. The drawback is that your frame rate in OBS might suffer. If everything is okay, you should be seeing the preview of your stream.
If you have more graphics cards installed, tick multi-adapter compatibility box in settings. Checking this will give you the best performance in OBS Studio by maximizing the amount of GPU that is being used.
5. Test your stream
At this point, it is best to invite some friends to watch your Twitch streams. Getting viewers’ perspective is an important part of the puzzle which will help you adjust your OBS broadcasting settings much faster.
6. Patience
Just remember, the road to the best OBS Studio settings may be frustrating at times, but it is ultimately rewarding. Don’t sell yourself short.
Best OBS microphone settings
Now, let’s go through the OBS mic settings. If you don’t know what you are doing, you can easily make your voice sound like rubbish, even with the best microphone imaginable. But don’t worry, I got you covered.
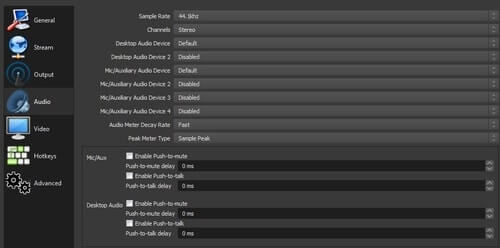
To start, open the mic/aux settings in the mixer window. To make your voice sound more professional, we will need to set up some filters. You don’t need to download anything, OBS Studio offers everything you need with these 4 filters: noise suppression, noise gate, compressor, and gain.
Noise suppression works by eliminating low-level background noise. To find the best level, slowly adjust the settings by going from -10 to -60 Db until you can’t hear anything in the background. This filter is ineffective for louder sounds; this is where you will need to use something a bit more powerful…

The noise gate is straightforward and easy to understand. It works by completely shutting down your microphone after the noise drops beneath a certain level. This is what is known as a close threshold. If your microphone doesn’t turn off after you stop speaking, you will need to play with this setting to find what suits you best.
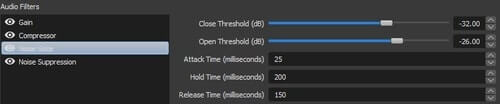
The open threshold is the Db level your voice needs to pass to turn on the mic. You should set it slightly below the level of your speaking voice.
Aside from this, the noise gate has settings for attack, hold, and release time.
- Attack time tells you how long time it takes to turn on the mic.
- Hold time shows you after which period the mic will turn off. Don’t set this too low, or your voice will sound choppy and unnatural.
- Release time stands for fadeout, and it will help your voice sound warm and natural.
Imagine the following scenario. You’re currently streaming the best game of your life. You finally win and begin to celebrate with screams of joy. Suddenly, your Twitch followers start complaining about how you just made them deaf. If you just used the compressor…
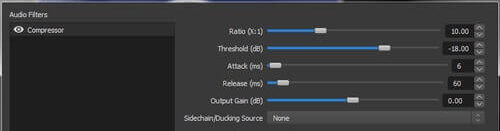
In situations like that, this filter would briefly turn down your input volume and save the eardrums of many. You should play with the ratio to find out how much compression your voice needs. The higher you put the ratio, the quieter your voice will be.
Attack and release time should be set very low so that your volume goes back to normal levels fast.
Finally, we have gain. This is an extremely basic filter used for boosting and reducing your overall volume.

Lastly, you should go to Output and change your recording format from flv to mp4.
Getting your voice to sound right will require some experimentation since there are a lot of things to take into consideration (acoustics, mic quality, natural volume of your voice, etc.).
Can I stream wirelessly in OBS?
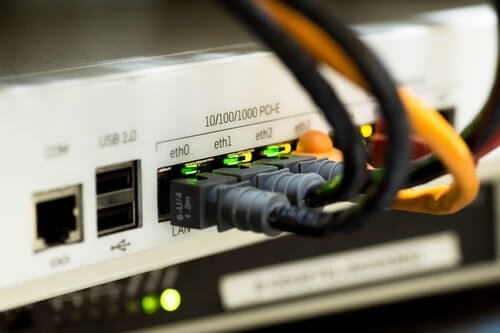
Hell no! Wired connection is much more stable, and even a smaller disruption on Wi-fi can cost you precious views. When you are streaming with OBS, the data needs to flow constantly from your computer to the Twitch server. If you stream wirelessly there is a higher chance of experiencing frame dropping, which will affect your gaming. I can’t even begin to count how much times I died because of this in Fortnite.
My OBS lags all the time
Don’t worry; I have a fix for that too.
We just need to find the best OBS settings that your PC can run. Go to tools and choose Auto-configuration wizard. Select to optimize for streaming (duh), and select the best resolution and frame rate you think your PC can run.
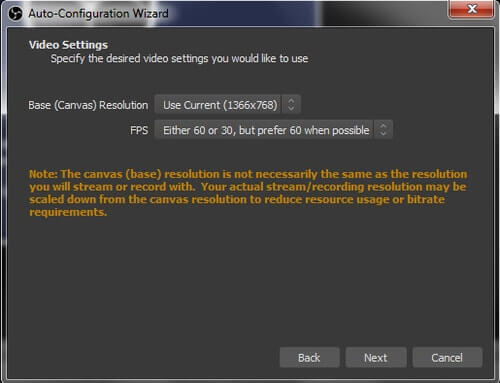
It is important to select the resolution which your monitor can handle and to use the same resolution in your game. On the next screen, select the Twitch platform and enter your stream key. You shouldn’t, under any circumstances, share your Twitch stream key with anyone. If you already did, we advise you to reset it. Please take this warning seriously.
Below it, we have the hardware encoding option. Leaving this checked will greatly reduce your CPU usage, providing that your graphics card has a dedicated encoder chip. However, this comes at a price and can result in lower stream quality. It is best to test both CPU and GPU encoding and see for yourself which settings work best in your OBS.
Click next and the OBS wizard will start with the test.
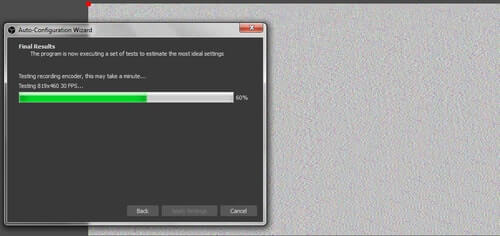
You will get your results in a minute or so. Keep in mind that these are only estimates. You will need to tweak some settings over time, which brings me to the next point.
Alternatively, you can just set the best OBS settings for recording. To change this, go to settings, then OBS Output settings. This way you can still upload videos of the best quality after you are done streaming on Twitch.
Congratulations! Now you know what the best OBS settings for streaming are. Don’t forget to look at my other articles, where I will be going more in-depth on some aspects of OBS and resolve common problems. Take care.
Check our other Twitch Streaming Guides