Hello guys! So, you want to start streaming in OBS Studio? You’ve come just to the right place. This tutorial will show you how to get yourself started with an OBS Studio. After you’re done reading it, you will know how to use OBS Studio, and will be streaming on Twitch in no time.
Fast navigation
What is OBS Studio?
OBS is an abbreviation for Open Broadcaster Software. OBS Studio is being used to stream on Youtube, Twitch, and various other platforms. It will let you stream games, tutorial material, etc. Even though it’s free, this is an incredibly powerful tool. That is why OBS Studio is hugely popular around the world. It is recommended that you use the 64-bit version.
OBS vs OBS Studio
In short, OBS Studio is a superior program. Its code has been rewritten for superior performance, even on the older computers. OBS Studio is also much more user-friendly, so it is easier to set up, especially with the help of this tutorial. While the regular version will ask you to install plug-ins, OBS Studio already has everything you need to start. Moreover, OBS Classic is not being updated regularly and doesn’t work with Twitch as well. Why complicate things?
Getting Started
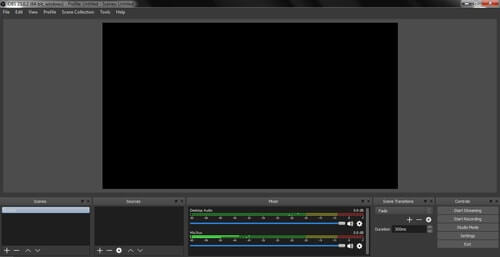
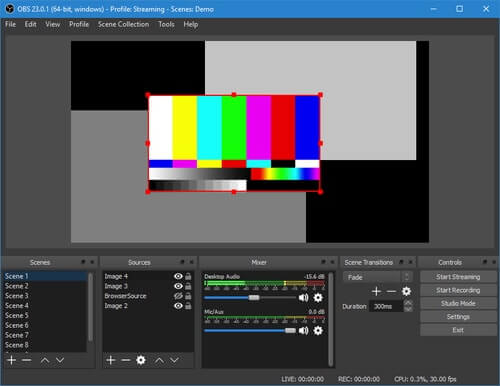
When you first open OBS Studio, you might feel overwhelmed. Don’t worry, that is why you have this tutorial.The big screen on top is for stream preview. It shows you exactly what OBS Studio will be sending out on Twitch or another platform of choice. On the bottom left, there are scenes and sources windows. Scenes are typically used for intermission, or when you are starting and ending your streams on Twitch. Sources window shows every element that will be shown (like webcam, game, notifications) in your Twitch stream.
Next, we have a mixer where we can easily play with our various audio levels to achieve studio like quality. We will be talking about mic settings later in the tutorial. In the right corner, we have scene transitions and controls. Below, you can see how long you’ve been recording and broadcasting on Twitch, frame rate, and CPU being used by OBS Studio.
How to set up your profile
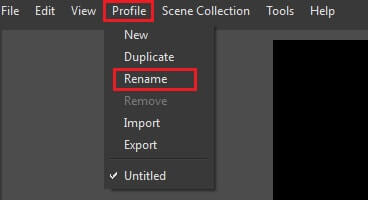
When you first start the OBS Studio, your profile will be untitled. To change this, simply go to profile and choose rename. You should use your Twitch name, so you always know that you’ve got the right profile.
OBS Studio will allow you to have many profiles with different settings and scenes. This is especially convenient if you are planning to Twitch-stream on various accounts, or want to do a podcast. Choosing different scenes for different games will let your Twitch streams remain fresh and cool.
Entering Game
In OBS Studio, go to the source window and click the plus icon. There are plenty of things you can choose from but for now select Game Capture. For mode, choose to capture any full screen application. Keeping your game in full screen mode will give you the best frame.
Multi-adapter Compatibility
If you have multiple graphics cards, you should select this to get maximum performance inside the OBS Studio. Sometimes, you will be playing games on a higher frame rate then what your streaming allows. This might present you with some FPS issues, especially if you have a weaker PC. Limit capture frame rate check-box circumvents this problem.
Some games have an anti-cheat system which can interfere with OBS Studio. Try enabling this option if you are still experiencing a black screen.
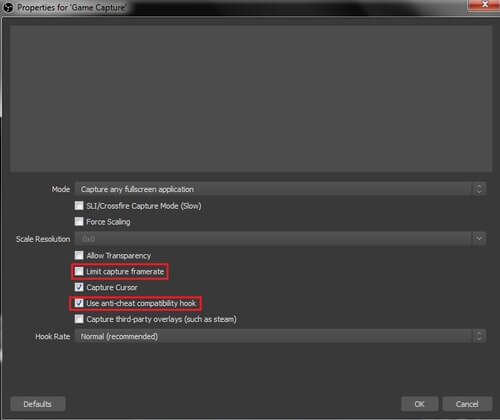
If everything is going smoothly, you should be seeing the preview of the stream that will be going to Twitch. If that doesn’t work, try choosing Display Capture or Window Capture. Now, onto the next step of this tutorial.
Streaming on 1 PC with OBS Studio
In this case, you should change your game display to the borderless window. It will still look the same, but you will be able to alt-tab much faster. You will want to have this function if you are fine-tuning your stream inside OBS or just want to read chat and interact with your followers from Twitch. Unfortunately, in this mode, you will lose some FPS.
If you are really invested in streaming on Twitch, I recommend that you get a second PC asap. Streaming on a single computer with OBS Studio is clunky and ultimately frustrating. For more information about Twitch, check out our tutorial for streaming on Twitch.
Adding Overlays in OBS Studio
A number of streamers grow larger every day. In order to be noticed, you need to have something which makes your stream stand out. Overlays will help you achieve just that. They let you promote yourself on Twitch by adding a webcam, recognizable logo, your social media accounts, etc. There are numerous websites that offer free and premium designs. Heck, you can let your creative side run wild, start Photoshop and create some yourself. The overlay will make your streams on Twitch seem more professional, which will surely attract a wider audience.
Adding text to your Overlay
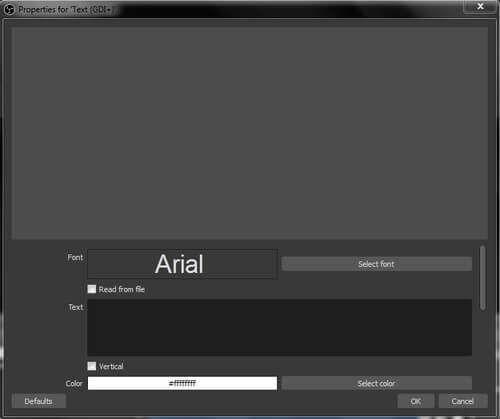
To add text to your Twitch stream, simply right click in your source window and select text. If you decide font size is too small, you should change it from properties windows. Resizing text by dragging it will make it all muddy and pixelated, which will not look good at all.
You can go pretty deep with text customization. For more on this topic see this tutorial.
Adding a Webcam in OBS Studio
Every professional Twitch streamer knows that a webcam is a must. Thankfully, OBS Studio lets you set it up easily. As you might have guessed, this is also done from the sources window. After selecting your webcam you can play with properties to find which options suit you and your Twitch audience the best.
Adding a capture card
Capture cards allow you to take your streams in OBS Studio to a whole other level. They let you save your streams and edit them as you like, so you can present people with montages like funny bloopers, epic moments, various tutorials, etc. If you are using a capture card you will need to set it up in the Configure Crossbar window.
Streamlabs

If you want to get notifications and display them on Twitch, you will need to use software outside of OBS Studio. Streamlabs is excellent for this purpose, and it is the most widely used live streaming tool. The reason it’s so popular is that it is fully customizable.
Your streams can immediately stand out with animated wacky notifications for new Twitch followers, nice donations, etc. It will add a ton to your online personality and it will engage your audience, making them feel much closer to you. Bottom line, using Streamlabs is the best way for getting more followers.
Adding Alerts
To add alerts to your stream, you will need to go to Streamlabs sidebar and click alertbox. Click on show widget URL and copy it.

Next, go into OBS Studio, click the plus icon in the sources window and select browser source. Paste the URL in the box, and select same FPS that you stream on. Let bottom options remain unchecked and click OK. Also, you need to make sure this source is on top of the source list. You will be presented with a blank rectangle.
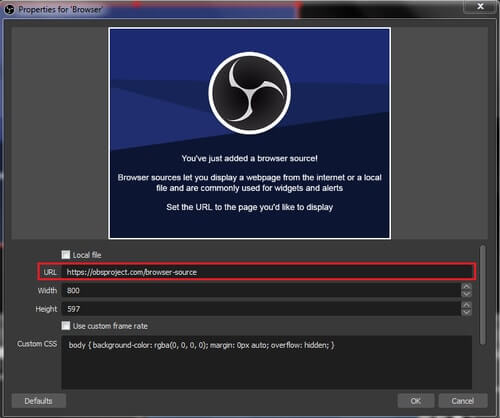
To test if it works properly, simply go back to Streamlabs page and you will see testing options. This is exactly what your Twitch followers will see.
Frankly, this is just the beginning of things you can add inside OBS Studio. If you are interested in finding out more, I would recommend you to start by watching this tutorial.
Setting up your microphone in OBS Studio
Audio setup is usually overlooked by OBS users, but this tutorial will cover it. Bear in mind that all of this won’t help that much if you are not using a quality microphone. To begin with, go to mixer window and select the small cog next to Mic/Aux and choose your microphone from the drop-down menu. Next, we will add up some filters to make your voice studio-like. Click the gear icon again and choose filters. Thankfully, OBS Studio has every one you will need.
Noise suppression

As the name suggests, this filter will help you remove some mild background noises, like computer fan noise, street noise etc. You should start from -10 Db and go down until you can’t hear the background noise.
Noise suppression is ineffective for removing background chatters, so you still need to be in a relatively quiet environment. You wouldn’t want people talking while you are recording something in studio right? Treat this the same way.
Noise Gate
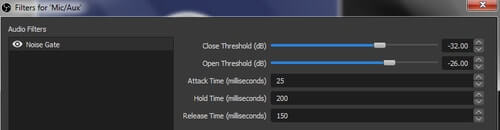
The noise gate is different from suppression as it completely shuts down your microphone when you are not speaking. This filter will bring you the closest to a studio level recording. When you select this filter, you will encounter the following options:
- Close threshold – When your microphone drops below this decibel level, the noise gate will disable it. If you find that your microphone is not going silent after you stop speaking, you will need to play with this setting.
- Open threshold – When you surpass this volume, your microphone will turn on. Set it slightly below the decibel level of your speaking voice. You will need to play around with these options a bit to find your ideal settings.
- Attack time – the amount of time needed for sound to activate the microphone.
- Hold time – how long the mic will be on after you finish speaking. If you set this too low, your microphone will be turning on and off in between the words, which will result in catastrophe.
- Release time – the amount of time needed for the noise gate to turn off your microphone (fade out). This makes your voice sound more natural.
Usually, the default settings for attack, hold, and release are good enough.
Compressor
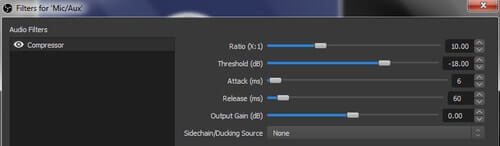
We’ve all had moments in a game when we were feeling like gods. Enemies were dropping down like flies, and we started screaming from joy. In events like that, this baby will help your followers not lose their hearing. The compressor works by turning down your input volume so that your voice doesn’t distort and become a nuisance.
Streamers who don’t use a compressor inside OBS do themselves a disservice, as there is nothing more annoying for viewers than a sudden and unexpected shriek. OBS lets you use the compressor, which will help you greatly. Here are some settings to help you set it up:
- Ratio stands for the amount of compression that will be applied. The higher you go, the quieter your voice will be.
- Set threshold to a level on which you want your voice to be compressed.
- Attack time should be set very low, so the compressor kicks in immediately.
- After your victory yell is over, release time dictates how fast the volume gets back to a normal level.
- Output Gain should be left as it is, for now.
As before, there are so many different factors to take into consideration, such as acoustics, the loudness of your voice and mic quality. You will need to play with compressor settings and find what works for you. Studio quality is not easy to achieve, but it will pay off in the end.
Gain

This is the most basic filter which only has one single setting. It lets you boost or reduce the overall volume.
Testing your stream
Finally, it is time to start your stream and test all your OBS Studio settings. This is the time to invite your friends to help you with finishing touches. Remember, once OBS Studio runs perfectly, you won’t need to touch these settings again.
What is a good bitrate for OBS Studio?
Bitrate stands for the amount of data that you send out while streaming. In OBS Studio, it follows an easy rule: with a higher bitrate, you will get better resolution and frame rate. Twitch has excellent tutorial on this topic. You can check the tutorial here.
But beware, if your bitrate is too high, the stream might be shut down. This is a mechanism Twitch servers use to protect themselves from hacking attacks. I would recommend that you start with the following OBS settings: 720 p, 2500 bitrate, and 30FPS.

That way, a larger amount of people can watch your streams without any lags. You want your followers to have a pleasant experience, right?
What bitrate is 1080p 60fps?
If you want to go full HD with OBS, your bitrate should be set between 4500 and 6000 kbps. You also need to make sure that you have a fast internet connection and that your PC is powerful enough to run these settings smoothly. You will need an i7 processor and a good graphics card. In case your hardware doesn’t meet the requirements, you will be experiencing constant buffering and frame drops. Oh, and don’t even think about streaming wirelessly! OBS Studio needs a constant stream of data, which can easily be interrupted if you are not using a wired connection. If you are interested in upgrading your PC you can look at our setup articles where we review hardware of famous streamers like Shroud and Tfue.
Where do OBS recordings save?
It depends on the file path you chose. You can easily check this inside OBS Studio by opening Settings / Output Settings.

How do I make OBS run faster?
If your OBS Studio is running slow, you should use the auto-configuration wizard. While it may not be perfect, using this tool in combination with this tutorial is all you need. It will let you configure your base resolution and frame rate. The base resolution in OBS Studio should be the same as in the game you are playing. If the resolution is too big for your monitor, the stream will look muddy and unwatchable, so you should be careful.
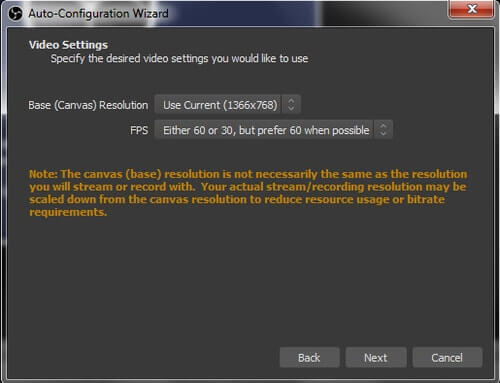
For now, select whatever frame rate you want as the wizard will show you recommended settings after the test is complete. For streaming service choose Twitch and input your Stream Key (if you don’t have it just click the link). Don’t ever share this key with anybody, as this is all a person needs to take your account. If you already did that, reset it immediately.
After running wizard, just apply the recommended settings and you are good to go.
So, there it is. A tutorial for everything you need to know about OBS Studio.